The Ultimate Guide to Light Modifiers in Photography

Mastery of the art of lighting is essential for creating stunning and professional-looking photos, but as a beginner photographer, learning how to properly use lighting can be a daunting task. There are many resources available to help photographers, both beginners and experienced, learn about lighting techniques and how to use different lighting tools and equipment, including online tutorials and courses, blog posts, articles, and online communities specifically geared towards photography. Books and other physical resources, as well as classes offered by photography schools and workshops, can also provide opportunities for learning from experienced professionals in a hands-on environment. As you learn about lighting for photography, it is important to keep in mind that practice is key and the more you experiment with different lighting setups and techniques, the better you will become at using light to create the desired effects in your photos. A variety of resources are available to help photographers, both beginner and experienced, learn and grow in their craft.
As a beginner photographer, learning how to properly use lighting can be a daunting task. However, mastering the art of lighting is essential for creating stunning and professional-looking photos. There are many resources available to help photographers, both beginners and experienced, learn about lighting techniques and how to use different lighting tools and equipment. One great way to learn is through online tutorials and courses, which offer step-by-step guides and interactive demonstrations. You can also find helpful tips and techniques through blog posts, articles, and online communities specifically geared toward photography.
In addition to online resources, there are also plenty of books and other physical resources that can help you learn about lighting for photography. Many photography schools and workshops also offer classes on lighting and other photography techniques, which can be a great way to learn from experienced professionals in a hands-on environment.
As you learn about lighting for photography, it’s important to keep in mind that practice is key. The more you experiment with different lighting setups and techniques, the better you will become at using light to create the effects you desire in your photos.
So whether you are a beginner photographer just starting out, or an experienced professional looking to improve your lighting skills, there are plenty of resources available to help you learn and grow as a photographer. Let’s get into the lesson…
Diffuser

A diffuser helps to spread light out from its source and soften its shadows. The sun is a giant natural light source and clouds act as a diffuser for it. When it comes to studio lights, a diffuser is a piece of clear fabric that you position between your light source and your scene. You can buy them, but they are pretty straightforward to make yourself, and in a pinch, you can always use a white bedsheet!
Softbox

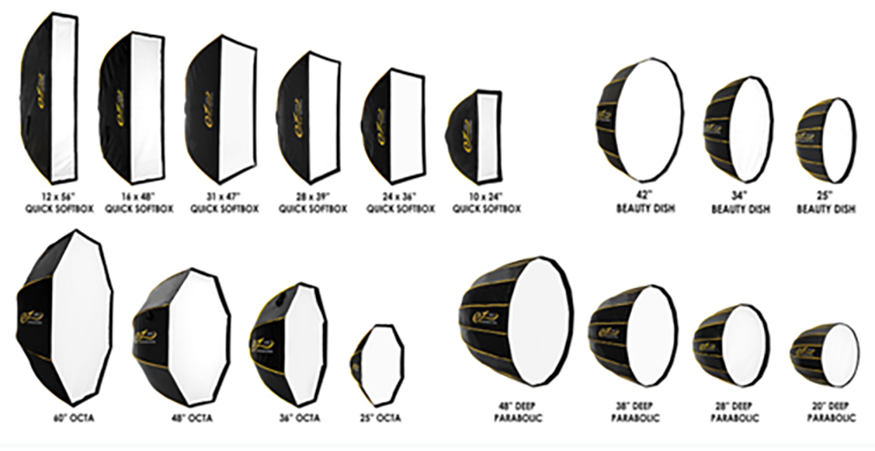
Softboxes are fairly self-descriptive pieces of kit. They are boxes, usually lined with reflective material, that enclose your bulb and let the light out through one diffused panel of the box. This diffusion creates soft light and shadows that are relatively easy to control and look natural. Softboxes are often the basis of the 3-point lighting setup, but being so easy to control means they can be used as a key or fill lights in almost any setting.
By choosing a larger softbox you will create broader light with softer shadows. Go smaller if you want more defined shadows. And remember that by moving your softbox closer to your subject, you will increase the size of the light relative to the subject, making it softer.
The box element of a softbox can be square, rectangular, or octagonal. The chances are that when you think softbox you think rectangle, which is a great mimic for window light, but octagonal softboxes–sometimes called octaboxes–are incredibly popular. They produce very flattering wrap-around light and the most natural-looking catchlights in your subjects’ eyes. You can also buy light domes, which are very close to hemispherical, that produce very smooth, very soft light.
Grids or honeycombs

A grid or honeycomb can be fitted over a softbox to help control the spill of the light it produces. They look like bees’ honeycomb (hence being known as honeycomb grids) and are great for helping to make a beam of light that is soft but focused. Grids are especially useful if you want your subject relatively close to your background with your subject well-lit but not the background.
Barn Doors

Barn doors are metal flaps attached by hinges to the top, bottom, left, and right of a light. They allow you to shape and direct light, and prevent it from spilling where you do not want it, but don’t have an impact on the quality of light (hard or soft). By adjusting the angle at which you open or close each of the four flaps you can shape the light falling on your scene, for example, you can produce a shaft of light that looks as if it could be falling through a half-open door.
Gels

A gel is a colored, transparent sheet that you place over your light source to alter its hue. In the first instance, gels are useful to help you correct the color temperature of your lights so that you can achieve a more natural-looking daylight effect. However, you can use them to give a tonal feel to your films or movies, too. Maybe you want to wash everything blue or purple for a sci-fi feel, or indicate that something is a flashback or memory sequence by sending it pink. How you color your lighting can add another significant layer to your storytelling.
If you’re shooting any green screen scenes, you can use gels to help balance out any green or blue light spill that might reflect off the background.
While RGB lights offer you a range of color temperature options, there’s nothing quite like the accuracy of a gel to ensure that you get the color temperature you’re looking for. These light modifiers are pretty inexpensive, too!
Snoot

A snoot is shaped a bit like an old-fashioned megaphone, but instead of amplifying your voice, you fit it around your light source to direct it precisely and prevent light from spilling into the shadows. If you want to ensure that your light has a defined edge, use a snoot. They are fairly simple to make yourself, which means that you can size them exactly as you need them, too.
Fresnel light
Fresnel lights produce soft-edged beams of light that can be used as spotlights or to wash over a given area of your set. Fresnel lights use fresnel lenses, which are concentrically stepped rather than smooth, to help concentrate the light into a manageable beam. If I tell you that it was invented by Augustin-Jean Fresnel to improve lighthouse lanterns, it should help you to understand the kind of light it produces.

The lamp itself sits on a track, between a reflector and the fresnel lens. The reflector sends the light into the lens, which in turn forms it into a beam. By moving the lamp and reflector closer to or farther from the lens, you can adjust whether it acts like a flood or a spot. Do be warned, though: fresnel lights can get very hot.
Flags

In this instance, we’re not talking about national flags. Flags used in photography and filmmaking are there to block light from falling where you don’t want it. You can use a flag to prevent light from spilling onto your background or to temporarily change the shape of the light emitted by your softbox. Even better, flags are simple to acquire or make. If you have a five-in-one reflector with a black side, that will do. So will black paper or cards. If you need something a bit more sturdy or something to cut to shape, pick up some black foamcore. You can secure it in place using clamps or tape.
Gobos

A gobo (sometimes called a cookie) is a cut-out screen or stencil that you slide in front of your light to produce a shaped shadow in your scene. You might want to use a specific logo or pattern if you’re making a promotional video, but gobos can be used more abstractly, too, for example, to mimic light passing through leaves or branches, or just to break up light falling on a background. Even simpler than a gobo, you can use a blind or shutter on a stand in front of a light to mimic light coming through a window.
DIY Light Modifiers
While you have a nice selection of light modifiers, it’s far from an exhaustive list. A light modifier can be anything that modifies light, and you can get really creative with it. If something gives you the light texture or effect you want, use it. A disco ball, a mirror, or a plant could give very interesting light textures; on one of our productions, we used a water tank as a sort of a diffuser to get a dreamy effect.

You have so many options to manipulate light and great excellent lighting for your videos. Now you just need to go out and experiment with your light modifiers!

